Mailroom Status
📌 Status Module - User Guide
The Status module allows you to create and manage statuses that can be used across the Mailroom system.
📋 Status Listing
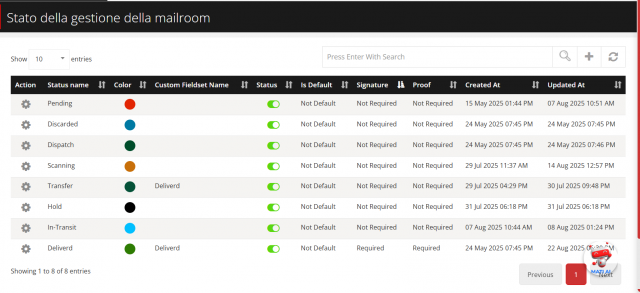
When you open the Status module, you will see a table listing all existing statuses.
Table Columns:
- ID → Unique identifier of the status.
- Status Name → The name of the status.
- Status → Whether the status is enabled or disabled.
- Custom Field Set → Linked custom field set (if any).
- Color Code → Color assigned for easy identification.
- Is Default → Color assigned for easy identification.
- Signature Required → Color assigned for easy identification.
- Proof Required → Color assigned for easy identification.

Actions Available:
- Add New Status
- Edit Existing Status
- Delete Status
➕ Add a New Status
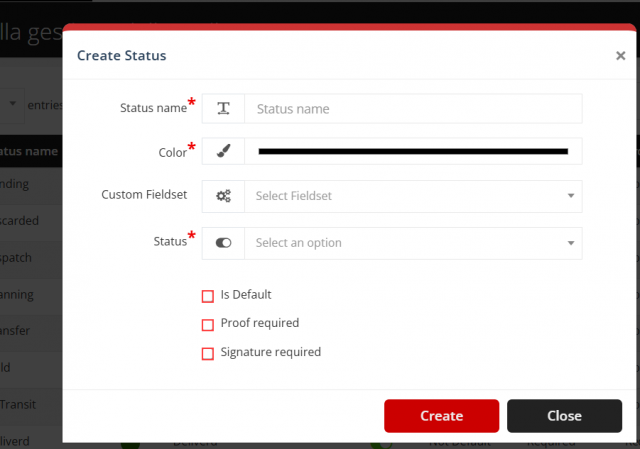
- Click on the Add button.
-
A pop-up will open asking for the following details:
- Status Name → Enter the name of the status (e.g., Pending, Delivered).
- Enable/Disable → Choose whether the status is active or inactive.
- Custom Field Set → Select custom fields (as integrated in Mailroom).
- Color Code → Pick a color for the status.
- Is Default → Pick a color for the status.
- Signature Required → Pick a color for the status.
- Proof Required → Pick a color for the status.

- Click Save to store the status.
✏️ Edit a Status
- From the listing table, click the Edit icon next to the status.
- Update the required details.
- Save changes.
🗑️ Delete a Status
- From the listing table, click the Delete icon next to the status.
- Confirm the deletion.
- The status will be removed from the system.
✅ With this, users can list, add, edit, and delete statuses easily.
We are continuously improving our documentation to ensure it meets your needs. This document will be updated regularly, so please check back for the latest information. If you have any questions or encounter any issues, feel free to reach out to us at support@itassetmanagement.in.