Mailroom Site
Site Management
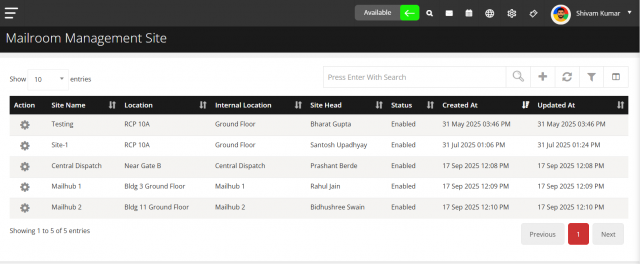
The Site Management section allows you to manage all sites within the Mailroom system. You can view, add, edit, or delete sites, and assign a Site Head for communication.
🔹 What You Can Do
- 📋 View a list of all sites with details such as Site Name, Location, Internal Location, Site Head, Status, Created At, and Updated At.
- 🔍 Search sites quickly using the search bar.
- 🔄 Refresh the site listing to fetch updated data.
- ➕ Add a new site.
- ✏️ Edit existing site details.
- 🗑️ Delete a site that is no longer required.
- ⚙️ Filter the site listing based on different criteria.
🔹 Site Listing Table
The site listing shows the following details:
- Action → Options to edit or delete the site.
- Site Name → The name of the site.
- Location → The location of the site.
- Internal Location → Specific internal place within the site.
- Site Head → User responsible for site communication.
- Status → Enabled or Disabled.
- Created At → Date and time when the site was added.
- Updated At → Date and time when the site was last updated.

🔹 Filter Option
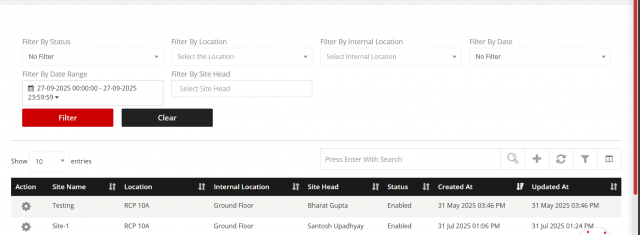
You can filter the site list to quickly find relevant sites. Filters may include:
- Site Name → Filter sites by their name.
- Location → Show sites in a specific location.
- Internal Location → Filter by internal location.
- Status → Show only Enabled or Disabled sites.
- Site Head → Filter sites assigned to a specific Site Head.
 Steps to use filters:
- Click on the Filter button or icon.
- Select the criteria for filtering.
- Click Apply to update the site listing based on the selected filters.
- Click Clear to remove all filters and view the full list.
🔹 Adding a New Site
-
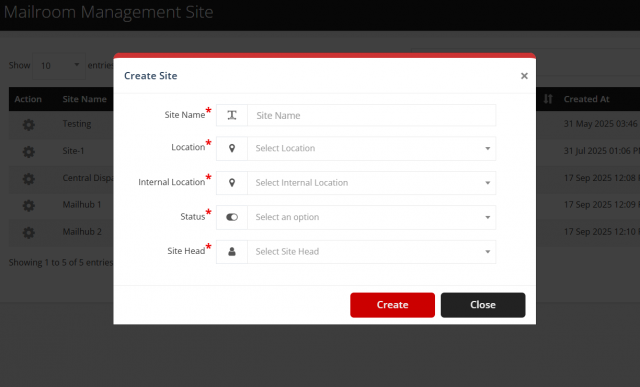
Click the + (Add Site) button.
-
A pop-up form will appear.
-
Fill in the site details:
- Site Name → Enter the name of the site.
- Location → Choose the site location.
- Internal Location → Choose the internal location of the site.
- Status → Set the site to Enabled or Disabled.
- Site Head → Select the user responsible for site communication.
-
Click Save to add the site.

🔹 Editing a Site
-
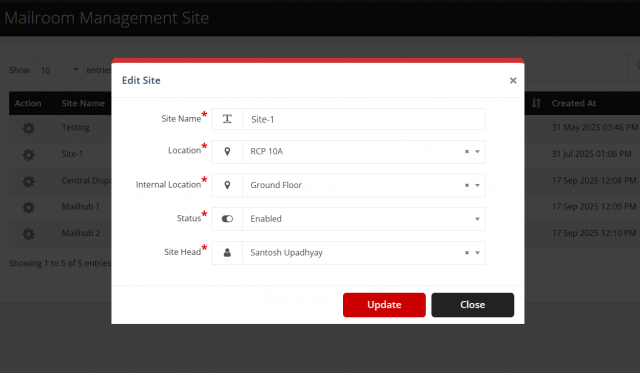
Click the ⚙️ icon next to the site you want to edit.
-
The Edit Site pop-up form appears.
-
Update any required information:
- Site Name
- Location
- Internal Location
- Status
- Site Head
-
Click Update to save changes or Close to cancel.

🔹 Deleting a Site
-
Click the ⚙️ icon next to the site.
-
Select the delete option (🗑️).
-
Confirm deletion to remove the site from the system.
🔹 Site Status
- Enabled → Site is active and available for operations.
- Disabled → Site is inactive and hidden from operations.
✅ Summary
With Site Management, you can efficiently maintain site details, assign heads for communication, filter and search sites, and keep all site-related information up to date.